Showing posts with label Post It. Show all posts

Sunday, April 19, 2009

Tomorrow is the big day! The grand opening of the Modern Sugar Blvd online store! Whooo! How exciting! Cruise on over there and check out all the amazing digi stamps! There is a little something for everyone!!

Here are some projects I created for the second round DT call using some of the very images you can purchase tomorrow! :)
Circle Card:

Image: Blogging Gal (MSB)

I threaded around the edge of the card with yellow floss. Then I embossed the white cardstock layer with the "Spots and Dots" Cuttlebug folder. The flower with flourishes is a cardstock sticker. I colored the image with Bic Write-It markers. I printed the sentiment from my computer.

Post-It note holder:

Image: Cake Gal (MSB)

This is one of the post-it note holders I am so fond of making lately! :) I used some Stampin' Up DSP (designer series paper) for the background. I will have to look up the name of it. I colored the image with my Bics.

Recipe card box/holder:

Image: Cake Gal (MSB)

I made the recipe box from a template I found on SCS. The background paper is "The Sweet Stack" from DCWV. I made the border with SU's scallop border punch. The chocolate chip cookies I made using a large circle punch and normal hole punch. Then I took a smaller circle punch and made bite marks.

MSB will be rockin' all week! Check it out for some great stamps, deals, ideas and more!! While you're at it take a look-see at the work of all the other amazing DT members. "The Sugars" are stock full of talent!!

Saturday, April 4, 2009

So many samples, so little time!

I have been franctically trying to prepare for my upcoming SU open house. Besides demos, I am trying to put together samples, gifts, door prizes...and who knows what else! So, I will be posting my examples as I make them. They are all VERY easy and simple.
This scrapbook page was made using only stamps and a few little pieces of paper. I love this stamp set (SU-Bugs & Kisses). Ever since my son was born I have used it more and more. This is especially handy since he LOVES dirt! I stamped the bugs and put them around the picture and along the bottom of the page. The letter "C" is from the SU set "Big Deal Alphabet". I took the picture of this page on a blue cardstock background. The page is actually 6x6 and white.

This monogrammed card was super easy to make. I just stamped the background with a flower from the SU set "Garden Greetings". The dot border is from the same set. I attached the two pieces of "Green Galore" and "Tempting Turquoise" paper together and stamped the "W" in the corner (SU-Big Deal Alphabet).


These are two sample cards I made to hang on my display board. I used "Garden Greetings" & "Just Buzzin' By", both from SU. The flower on the red card is pop-dotted 3 times on each layer.


Lastly, this is the final Post-It note holder I am making for the door prize drawings. I made three total. I am not 100% sure I will use only the notepad holders, but I will at least use one. They are so simple to make. I put the instructions in the "Game Night Scorecard" post. I think these will also make great hostess gifts as well as demo ideas.


Well, I am on my way. I have a lot more to do, but it helps knowing that some things are done! :)

Tuesday, March 31, 2009

Game Night Scorecard Holder

I have made my first hostess gift/door prize! Yaa! I'm feeling more official all the time!!
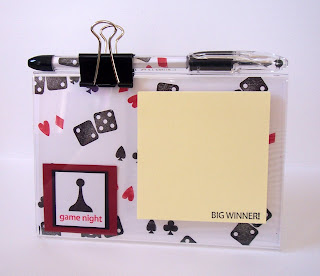
Stamps: Game Night(SU)
Paper: White Cardstock
Ink: Real Red(SU), Black
Accessories: Pentel RSVP pen, Post-It note pad, Acrylic 4x6 photo frame, Tacky tape, Binder clip

You can get the acrylic photo frames at Walmart for $1! You just stamp your paper (or use patterned paper), and slide it in the frame. You can put the sentiment on the paper or on the outside of the frame. I put it on the paper so it wouldn't get caught up and torn off during all the dramatic game playing action! The post-it note pad is adhered with the tacky tape. I also originally planned to use the binder clip to hold the note pad in place too, but liked that it held the pen. So, it can serve double duty if needed. Then I took a piece of the stamped cardstock (1"x3 1/4") and rolled it up into the barrell of the pen. This was kind of a pain because my cardstock was sort of thick. I think patterned paper would go in much easier.

I plan on using this for a door prize at my first open house. I think it will go over well since all of my friends and family are avid game players. If not, then I'll keep it! :)